8-bit / Minecraft old school knitting
/I am old, and therefore remember when 8-bit graphics were all you got, man. But these kids today, and their 3-d fancy rendered video games don't know how good they have it! Hey you kids, get offa my lawn!

Anyway, a few folks I know are interested in making all the cool hipster 8-bit, or Minecraft, graphic knitted things, like say, a hat. To which I say, I can help with that! (After they told me to write this. So ok. I do as I am told, sometimes)
Knitted color work is not that difficult, it's a trick, like anything knitting. Once you do it, and puzzle it out, it's easier than you think.
Especially 8 bit graphics and Minecraft emblems, which are already pixelized and therefore DEAD EASY to transfer to a knitting colorwork chart. (I know, all those words may sound scary but THEY ARE NOT, TRUST.) I am going to assume that you already know how to knit, and can knit in the round, because while I can teach someone how to knit in person, online is a whole other ball of wax.
Colorwork knitting is also called stranded knitting (because you are knitting with two strands of yarn, different colors), or fair isle knitting. In stranded knitting, you are using two colors of yarn per row, and are knitting some stitches in one color, some in the other color. (There's also intarsia, which is a whole other thing--think the images in ugly Christmas sweaters and big blocks of color.)
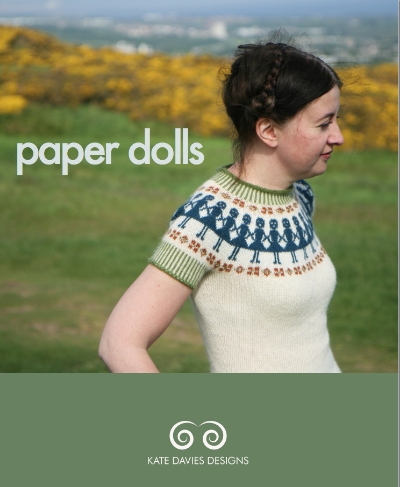
This is not an ugly Christmas sweater. This is Paper Dolls sweater pattern (c) Kate Davies
You can make all sorts of amazing, complicated-looking color patterns and pretty things with this technique. Kate Davies is a master of this--this is her Paper Dolls sweater, (ravelry link) is it not GORGEOUS? Go click through and look at her other stuff. Go buy her patterns. Support knitwear designers!
So there are a few rules to stranded knitwork, which will make your life easier. When you're knitting a stitch in Color A, you carry along Color B behind; and vice versa. Best practices is to keep the strands behind pretty loose so you don't lose the elasticity of the knitting, and to also not have more that 5 stitches of one color at a pop (so your strands, or floats, aren't too long and easily caught on things like hands, and ears, and glasses).
It's easier to understand when you see it (this is not me--this is the wonderful youtube channel, knittinghelp):
Now, the 8-bit stuff! Go find, or go draw, an 8-bit image you like. Or pixelate a regular image to make it 8-bit-y. Got it? Ok good. Now you're going to take that image and make it into a knitting chart. I'd suggest starting with a one-color image, since you're really going to want to only work 2 colors per row of knitting. Plus it'll look cool and graphic and stuff.
You can make a pretty simple knitting chart for colorwork in Excel, if you're tech inclined. Or on graph paper, if you're not or just want to play with colored pencils or markers. Hell, you can even go download knitters graph paper, which mimics the proportions of the knit stitch (slightly taller than it is wide) so your image doesn't come out wider and shorter than anticipated as it may using regular square graph paper.
Take your graph paper, take your image, and transfer the image to the graph paper, square by square. If you're working on paper, this is actually pretty easy--put the graph paper over the image, and unless you're using fancy thick paper you should be able to see the ghost of the image on the graph paper. Color it in. Voila! You now have a chart!
Remember how I said you generally don't want more than 5 stitches between color changes? Look at your charted image and count the squares. If there's more than 5 stitches in a color span, add a dot of the contrasting/background color. (like so: XXXXXoXXXXX) I promise it won't look too weird.
Ok, so now you have your charted, tweaked, image. You can knit it! Knitting from charts is straightforward. Each box is a stitch. If the stitch is colored in, knit it with your image color. If it's not colored in, knit it with your background color. You'll be working from the bottom of the chart up, and reading/knitting the chart from right to left, bottom to top. Each row of the chart is a row of knitting. If you're knitting in the round--and for reals, you should be, it's easiest to go circular for stranded knitting--this means each row is a round, and you will ALWAYS be starting at the right hand side of the chart and working to the left.
Depending on your gauge/the size yarn you're using, you can repeat the image around the circumference of the hat, like say, a line of space invader dudes around the brim of a beanie. To do this, take your chart, and make sure you have a few stitches/columns on either side of the motif in the background color. Now, count the stitches in the chart, including these columns, this will be your repeat.
Let's say you're doing a hat with a 10 stitch motif, and you want two stitches between each motif--your repeat is 12 stitches. Cast on a circular needle enough stitches for a hat: MAKE SURE THE NUMBER OF STITCHES ON YOUR NEEDLE IS A MULTIPLE OF YOUR REPEAT. (in this case, 60 st, or 120 st, or whatever works with the size yarn/size head). No one wants a space invader cut in half. Use a stitch marker to mark the beginning of your round. Work a few rounds in the background color, either in a non-curling pattern (like rib) or for an inch or so in stockinette (for a rolled brim)
When you hit where you want the image, begin your chart. As you knit, you'll knit the first row of your motif as per the chart, and then the two stitches in the background color, then knit the first row of your motif again. And the two stitches of the background color, again. Repeat all the way around. Then do the second row of your chart, and repeat it all the way around. Then the third row....etc. when you've completed the full chart of the motif, break the motif yarn, leaving a tail, and finish up your hat with the background color.
(How to finish a hat you ask? Knit until it's as tall as you want, then decreasing for the crown at even points. Divide your stitch count by 6 or 8, and mark these points using stitch markers. K2together at those points every other round until you have half as many stitches as you started with. Then k2tog at these points every round until you have either 6 or 8 stitches--depending on how many points you picked--break yarn and pull the yarn through those stitches left, pull tight. Weave in ends, boom you have a hat.)
So, let's say you're working in super bulky yarn and only want one image on your hat.
- I hope you like weaving in ends.
- Consider two images? One front, one back?
- No? How about a dotted hat, alternating the two colors around the hat, except where the motif is (aka: knit the motif, then knit 2 stitches background, 2 stitches motif color, around until you get back to the motif)?
- Still no? Welp, get ready to weave in ends.
Ok then. Follow the same instructions, only decide where you want your motif. When you're ready to start the image, begin knitting your chart the same way. Knit the first row of your chart once, drop the motif yarn, cut leaving a tail. Knit in the background color til you get back to the motif. Add in motif yarn, leaving a tail, knit the second row of the chart, drop the yarn leaving a tail. Repeat.
Finish up the hat and weave in the copious amount of ends and regret your choices in life. (I kid! I kid!)