DIY wall hangings on a cardboard loom

Have you seen the anthropologie, boho style wall hangings popping up everywhere lately?  This fall I got really into weaving again because of them.  

I say again, because when I was in high school, I did some weaving, both on a tabletop cricket style loom (my color choices were... lacking on that one), and also a straightforward tapestry loom.  I still have the tapestry hanging in my office, and it's one of my favorite things I've made.

it's held up quite well since 1993, no?

Here's the thing:  weaving is not hard--over, under, over, under.  Making a loom from cardboard is not hard.  They are literally crafts for preschoolers.  But you can make some gorgeous stuff on them just with a few key choices on your part.

There are several gorgeous small maker tapestry loom artisans out there making some amazing tools that are totally worthwhile if weaving is going to be a major hobby for you (heeey there Hokett looms! I got three of you for Christmas and am LOVING THEM), but if you just want to try it on for size, and don't want to financially commit much scratch to the project, just scrounge around for some cardboard.  I'm sure you've got an amazon box floating around somewhere. The weaving I made it on waaaay back in the early 90s? Done on cardboard.  

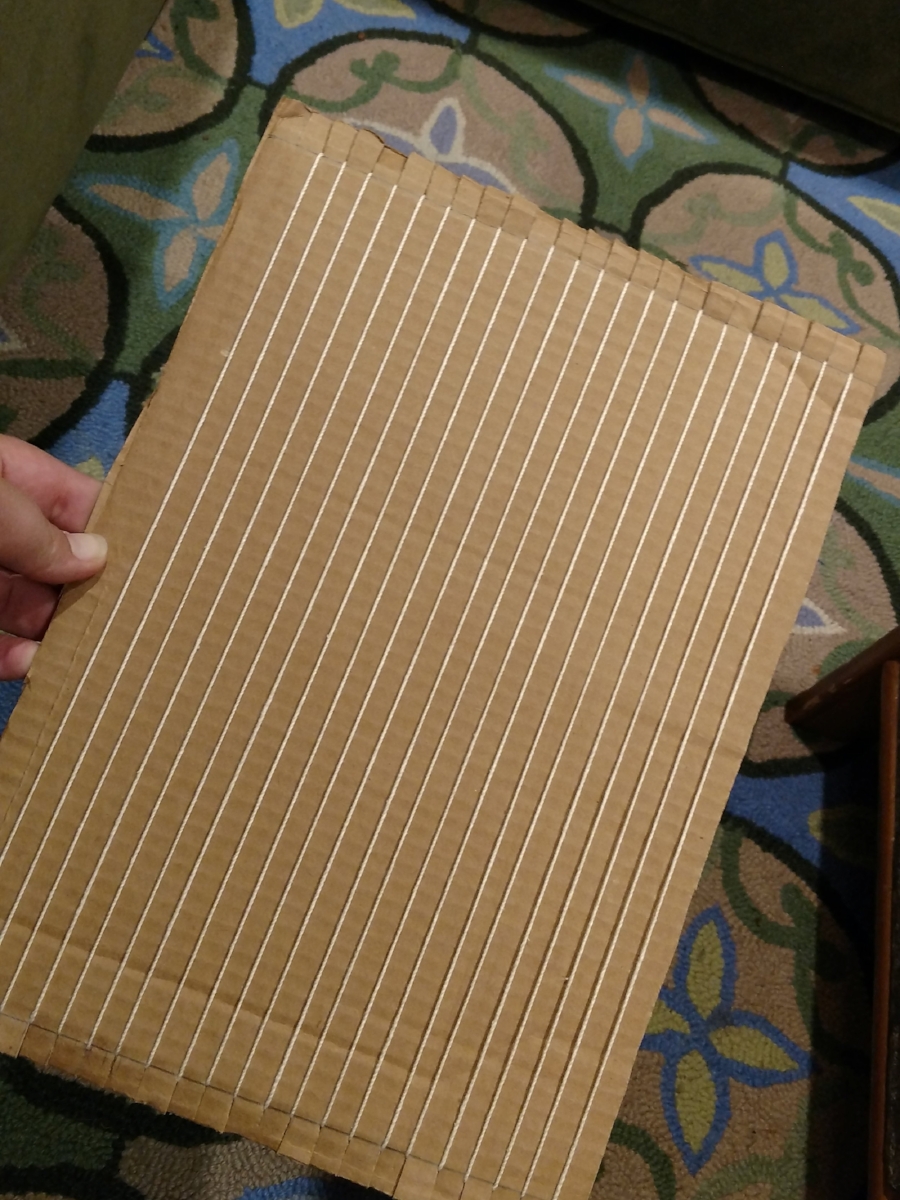
Now, ovbs, that's not the same loom I made back in 93.  I keep stuff, but I'm not a hoarder.  This one is a new one I made to do a few wall hangings on.  It's a top flap of a box something or other came in, and perfect for a loom because it's relatively sturdy with no creases or bends, and not enormous.  This is a lap loom, so think about what will make an appropriate size for you.

I took a ruler and pencil, and marked a straight line across each short end, about an inch in from the edge.  Then I measured every 1/2" along that line, and drew a line for my notches.  Using scissors, I cut in along those notch lines from the edge to the marked line, and no further.  Do this on the top and bottom, and voila.  A loom has appeared!

As a reminder: warp threads are the threads that go up and down vertically on your loom.  You weave over and under, back and forth, with weft threads.  Warp threads are best to be relatively smooth and strong, as they are more under tension than weft.  You can use pretty much anything for weft.

a wall hanging done with a jute twine warp

For a tapestry or wall hanging loom, when I don't want the warp threads to show, I just use crochet cotton, the kind that comes in a ball with a cardboard core.  It's thin, so the weft threads can pack around it; it's strong, so I don't need to worry about breakage; it's smooth, so I don't need to worry about weft catching on it or it abrading away with all the over-under-ing going on; and it's cheap.  You can, of course, get actual rug warp thread, which is advisable if you're going to go hardcore on this, but I have yet to have a problem with crochet cotton.

I've also done several weavings where the warp was designed to show, and in this case, I used sisal twine.  Though a bit rough and not super flexible, it looks great and rustic, which is what I was going for.  Kind of a pain in the ass to warp the loom the first time, but I got used to it.


to begin to warp your loom, and secure the ends

To warp your loom, first secure the end of the warp thread to the back of the loom--see above.  Sometimes I use tape, sometimes I tie a double knot around the notch.  Tape's easier, but can work itself loose.

Once the end is secure, run the thread down through the notch to the front of the loom, and down to the corresponding notch on the lower edge of your cardboard.  Run the thread through the notch, and back around the next notch in line, making a little loop behind the notch, as you can see above.  Make sure you pull your warp snug, you want a bit of tension in the warp but not so much you bend the cardboard.   Run the thread up to the next open notch on the top edge, go around the back of the notch, and run the thread through down the front again.  Keep doing this for every notch, so the warp threads are all on the front of your loom, as seen here:

When you've filled your last notch, cut the warp thread from the spool, leaving a good 6" or so, and secure the end to the back--again, either with a knot or a piece of tape.  Voila, you've warped your loom!

Now, check out that image above again.  There's a narrow rectangle of cardboard down at the bottom.  That's from a cereal box, and I wove it over and under the warp threads to keep an even space at the bottom.  Later, when you're done with your weave, you'll need to finish it by tying off the warp threads and either making fringe or weaving the warp ends in the back of the piece.  You can skip this spacer if you're planning on using a dowel or stick at both the top and bottom of your weave.

over, under, over, under . . . note the rounded shape of the weft

Now you're ready to weave! Thread a tapestry needle, or other needle with a large eye, with your chosen weft yarn, and start going over and under your warp threads.  Leave a bit of a tail in the back of the piece to weave in later to secure the weft threads.  

Oh, and if you've done any weaving before I'm sure you've encountered the dreaded pulling in of the sides.  It happens to all of us the first few times and the key to avoiding it is to NOT PULL TIGHT.  In fact, bubble the weft thread at an angle as you go over and under, and don't yank on the weft.  Gently push the threads down with your fingers, a wide toothed hair comb, or even a fork (this is called beating down the weft).  The actual act of going over and under threads takes up some of the length of the yarn, and by bubbling or angling the weft up before you beat it against the previous rows, you're allowing the weft to take up that length, and settle nicely.

I highly recommend using a relatively plain worsted weight or thinner yarn for the first few rows of weft, and weaving a plain weave, or tabby weave, for several rows.  The plain weave is literally: over one thread, under the next.  On the next row, go under the threads you went over last time, and over the threads you went under before.  This will help give a nice selvedge edge to your hanging.

When you come to the end of your weft thread, pull it through to the back, leaving a few inches as a tail.  Then thread another piece--same color, different color, whatever you want!--and keep going.  Change colors, skip warp thread (over 2, under 2; over 2, under 1, etc.) to get the pattern you want.  Add fringe with rya knots, texture with soumak weave, weave straight lines, angles.  There are infinite possiblities! And try lots of things for your weft! I love working with roving and wool top (unspun fiber), jute twine, and metallic fibers, and I've seen amazing weaves made with birch bark and ribbons as well.  Mess around, see what you can come up with!

I am not the fringiest of ladies, but sometimes, it's called for.

work in progress, featuring rya knots, soumak, and roving. The big puffy white section is wool roving, the narrow line of white is a line of soumak weaving in a chunky yarn.  The rya knots make a fringe.

When you've reached the top of your cardboard loom, you're ready to finish your weave! You need to pop the weave off your loom, leaving the warp loops as is.  Since I tend to hang my weaves from a stick or a copper pipe, I use the warp loops at the top of the loom, and just slide a dowel or a stick into them.  The bottom loops I cut and tie together in pairs using a square knot.  If I've done fringe at the bottom, you can leave the warp ends as is.  If I've skipped fringe, I use a tapestry needled and weave the warp ends back up into the weaving on the back side. I also weave in the loose ends of the weft from color changes and yarn ends to secure them a bit, and trim close to the work.  Because the wall hangings don't actually take on a lot of stress or weight, the ends are not likely to work themselves loose.  

 The Weaving Loom has some fantastic weaving tutorials for things like rya knots and soumak weaves (wrapping around the warp threads for texture).  I highly recommend checking them out, as well as a number of other weaving tutorials on you tube. There's a wealth of information out there.

It's weird because after years of training myself not to work with yarn under tension, and to never tie knots, I'm now into two fiber crafts where it's ok to keep yarn under tension and ok to tie knots. 


Have we talked about cocktails?

Have we talked about cocktails?

premixed cocktails kept in the freezer.

It's a goddamn REVELATION. 

As in, make an enormous batch of manhattans in a mason jar and KEEP IT IN THE FREEZER ALL THE TIME. When you want a drink? Pour into a glass and top with a cherry.  DONE AND DONE.

Now, manhattans are my jam for the colder months.  But summer months? Negronis. 

Read More

The Aloe is dead. Long live the Aloe.

Preface: I love plants. I love the look of a lot of houseplants and a big lush English style garden. But the outside makes me itchy and has bugs and is hot, and I am a slacker when it comes to plant maintenance. Because, once again, dear readers, it all boils down to: I am lazy.

the collection. The big pot with the jade in it used to be the aloe plant. The other two are newbies that have yet to feel the pain of my neglect. And oh man does that table top need a helping hand. Oof.

And yet.

In 1997 or 1998 after college (shut up I'm old), I got an aloe plant. Probably from some random garden center or Home Despot or someplace. And by some miracle, I have kept this sucker, alive, and for a time, thriving. By sheer luck. And neglect. 

The aloe in better health, but a poorer picture. And piles and piles of crap around it. 

At it peak, the aloe was massive, too heavy to lift by myself, and poking the faces of the cats and kids on the daily. The cats loved it. Kids, not so much.

And it was getting so big it was starting to topple over. It shared the massive pot with a jade plant that was rapidly taking over. Just look how droopy that poor thing is. The aloe had started send out little babies to make their way in the world. The time had come.

I yanked the big sucker out of its pot. I pulled the babies too, leaving the jade to take over the giant pot and be the rambling crazy sprawl it so wants to be. I have no qualms about chopping back a jade plant if it starts sprawling the wrong way. Those things are impossible to kill and will propagate at the drop of a hat, or leaf, as it were.

In the past, I'd had success with the aloe just yanking off the saddest of leaves and repotting the rest.  But this time, it was just too far gone for a mild renovation. It had lived a nice long life and I didn't think it was going to settle nicely into a new pot, so out in the tub trug it went. 

the aloe is dead. Long live the Aloe. 

And its baby took its rightful place as the new aloe for me to neglect and possibly kill. Last year I threw a few pots on the potters wheel with the idea toward putting some succlents in them.  I even thought ahead (a rarity) and added drainage holes while trimming them before firing them.  However, I killed the succulents within two weeks, so the pot had just been laying empty, waiting for it's one true love: baby aloe. Top with some pebbles so the toddler doesn't decide to go digging in the dirt, et voilà. 

long live the Aloe! (And the jade plant behind it)

Swim bag

Yeah, maybe soon I'll actually be on a better-than-not-even-once-a-month posting schedule. Theoretically yes, since work stuff has eased up a bit, and we've finished moving. . . But on the other hand it's about to be summer and really, who am I kidding?

But in the meantime, speaking of summer, it's gorgeous here today, and I am already thinking of the pool. The problem with going to the pool is that's getting ready for the pool is effing torture.

Unless.

Unless you have a ready packed swim bag with all your crap in it, ready to go at a moment's notice.

a fully packed swim bag, complete with mulch stain from last year

Here's the thing: I am fundamentally lazy. So I'd much rather put 30 minutes of effort into something once a season to prevent the inevitable "goddamnit, where are the towels?!?!" that would happen EVERY DAY otherwise. 

This way, I never search for sunscreen--it's in the bag. Goggles--in the bag. Towels--in the bag. Snacks--in the bag. My rash guard and suit--in the bag.

What exactly do I pack? Well I'll tell you. And show you! Because who does not love a good "What's in your bag" piece?

fully unpacked. It all goes in the tote.

Back row: tote and towels.

Second row: wet bags, sunscreen on top; mesh duffel with piles of toys on top; big kid's swimsuit, rash guard, and hat.

Third row: my swim coverup, above goggles and sunglasses; my swimsuit and rash guard; diaper clutch with uno, soap case and brush on top, sitting above the prescription goggle case; little one's oldey timey bathing suit and swim dipe.

The bag:

Lands End's XL tote, with the embroidery so everyone knows exactly which bag is what. We have some L.L. Bean totes, which i like for the stiffness of the canvas, but I need the pockets and the attached key fob. (This was purchased before LE stuck their foot in it by retracting the Gloria Steinem interview after right wing nutjobs bitched about feminism. As such, I wrote them and told them that until they got a goddamned spine they'd lost all my business. Which was considerable. And now I'm without a go-to tote and swimwear place. Assholes. Also why I'm not linking to them.)

Towels:

The biggest little has a specific pool-branded towel he likes, but the rest are Turkish foutas, or peshtemal. I am OBSESSED. They absorb a ton, dry out quickly, are cute, and I got them off of eBay (from this shop--the thick ones are the best) for way cheaper than the fancy places sell them. 

Wet bags:

Two of them. Because inevitably one will not get put back. And tell me why I never knew these were a thing until I had kids? Cause they are AWESOME. The Skip Hop one has a mesh outside pocket which is where I stash my swimsuit and rash guard.

Packing cube:

That's the black mesh bag. Holds the boys' swimsuits and rash guards.  Please to note the little one's oldey-timey one-piece striped job. Last season The Gap had a similar suit that I am kicking myself for not buying in all the sizes, so I hunted one down from Etsy this year (do you die? I die. That is some cute ass shit right there). I need to find him a toddler-sized straw boater, a handle bar mustache, and teach him some barber shop harmonies before fourth of July.

Packing cubes are the shit by the way. I got a bunch in multiple colors from ebags a few years ago. So now when we travel, the boys and I have our stuff color coded. Biggest little is red, littlest little is orange, I am green. It makes packing all those tiny little socks so much easier. JBB is on his own, cause he's a grown ass man and can pack his own stuff.  

Diaper clutch:

That's the crazy patterned zip bag (it's a Ju-Ju-Be wristlet; I have a couple because they are the perfect size and I cannot resist an obnoxious pattern), which is also waterproof so can function as a wet bag just in case. This one holds a tiny wet brush, a spare barrette for me, soap, and all the other little toiletries that we'll seem to collect randomly over the season.

Toy bag:

That's the blue mesh duffle, which is new this season. I straight up copied another parent at the pool who had all their water toys and dive sticks in a big mesh nylon bag. Genius. It fits in the main bag to go to the pool and can just hang out separately on the way back. 

Goggles: 

Two pairs for the littles and a prescription pair for JBB (in that fancy stripey case) get tucked into one of the side pockets. I am neither blind nor a delicate dainty flower about opening my eyes underwater so I skip 'em.

Sunscreen: 

Side pocket, alongside extra swim dipes. I have sunscreen in every car as well. Because, preparation! I should buy stock in Banana Boat, Coola, and Supergoop, because despite trying seriously every brand under the sun, those are the only ones that are easy to put on (no ghostly cast or impossible to rub in craziness), smell nice, last a while, and actually work. 

Sunglasses:

Kid ones go into that little drawstring bag. Mine are either on my head or in the car (I have no joke 6 pairs stashed in there. Again, preparation).  I've had good success with picking up kids sunglasses cheap at The Gap.  I have zero faith in either kid's ability to not break things or lose things, so I get multiple pairs when they have their massive sales.

Etc.:

Uno--a pool STAPLE--goes into a little pocket. Not shown but thrown on top will be a skip hop diaper clutch (also have spares on both cars, because, preparation) with wipes. I generally just throw my wallet and phone on top; my wallet is one of the cute ones from Mochithings hat will hold my phone as well. As I'm sure you can tell, I am a big proponent of the "little bags inside the big bag" method of organization and that site is the best source for all kinds of pouches and wee things. Keys get clipped to tote's attached fob. I usually throw a magazine or book along the side edge, and a water bottle and Cheez-its for the hangries. 

Swim bag, organized and packed, with the toy bag in front.

It is amazing how much crap I can pack in this bag. All that stuff, turns into this...

Swim bag, packed! All but the toy bag which gets thrown on top.

Oh, and this is just for me and the kiddos. Any other grown ups are on their own with their stuff because THEY ARE GROWN UPS and can handle their own shit. Except for the goggles. I got tired of the misplacing of the goggles. 

One project wraps...

upload.jpg

and another begins.

  I've just finished up my Uniform sweater, and it's blocked, drying, and just needs the buttons (which, shockingly, I have!). More to come on that once I've got the buttons on it.

And so I'm on to the next project, Clouds in my Coffee by Elizabeth Smith, aka The Brown Stitch

I am doing this one in Shepard's Wool, from Stonehedge Fiber Mill in Michigan. This wool is amazingly soft and wooly, very light despite being worsted spun. And the milk chocolate (no really, that's the name of the color) color is perfect. (Though I normally take my coffee much lighter than this.)

  I've done my usual pattern prep, where I write out the pattern for the size I'm doing in my own shorthand on a piece of my circa notebook paper to carry along with me. This way I can use tick marks, additional notations, tweaks I'm planning on making, etc. It's like a paper version of the notes section of ravelry. Plus this way I've read through the pattern already, knitted it a bit in my head, made any adjustments I think might be necessary for the way I like things to fit, and theoretically should have no surprises coming my way.

It's not easy being green--keeping up with the CSA

(Could I resist that headline? No, no I could not.)

We are members of our local CSA--that's Community Supported Agriculture, aka when you pay a farmer in the winter/spring and get shares of the veg/fruit/etc. that he or she grows over the course of the season.  Our local CSA is awesome, and has a fantastic farmer at the helm of the food.  There's also a separate fruit share--POUNDS AND POUNDS OF PEACHES PEOPLE!--eggs, chicken, the whole nine yards.

Anyway, one of the blessings and the curses of belonging to a CSA is figuring out how to cook and eat truly seasonally.  And because we are in New Jersey, and not like Portland or the Bay area where temperate climate means year round growing seasons, almost, our season runs from June through November.

And it also means a shit-ton of greens at the beginning and end of the seasons.  (Did I mention the BUCKETS of Jersey tomatoes in August? Oh wait, I did not, because it's not nice to make people jealous on purpose.)

I love me a good salad, but I am also lazy and fickle when it comes to planning my dinner. And, dude, keeping up with things like a CSA is not my strong suit, I am the first to admit. So JBB and I have figured out a few ways to manage our CSA share, especially when the CSA share consists of like 6 bunches of different kinds of lettuce. The first principle is one that food writer Tamar Adler helped popularize recently with her book, An Everlasting Meal (not only is that an affiliate link, but I went to college with her. Different years though.), and that is to prep and process food when you get it. That way when you go to make a meal, everything is ready for you.  25 minutes one day gets you set for the rest of the week, and takes making a salad from a pain in the ass production to a quick solution for a meal.

Once a week, when we get the CSA pick up, we "process" the greens and wash them all at once, and store them, ready to go, in the fridge. 

Here we take a page from Alton Brown's book (show, really), and put Science to Work! We always try to wash the fragile greens like lettuce and arugula and the like right away, since they're leaves, they wilt, and when they get gross they stink.

Fill a sink with cold water, tear the leaves off the core of the head of lettuce (don't cut! Cut edges brown), and throw them in the cold water. Completely submerge them and swish them around a bit.  If they're at all wilted, let them sit in the cold water for a while. The water's not going to hurt the greens at all, so be lazy and let 'em soak.

big sink o greens

big sink o greens

Do you have a salad spinner? WHY NOT? They're awesome for this thing, though a pain in the ass to store, but they do double as a nifty Wheel of Death for Hot Wheels cars, as well as a lesson in centrifugal force, so there's that.

(NEVER A SINGLE TASKER, ALTON! NEVER A SINGLE TASKER!)

Ours is Oxo (affiliate link), but there are a ton out there that are good.  I prefer the pump kind with a brake to the pull-string kind.  Though growing up, we totally had the pull string one, which was super entertaining when you're eight. Which might be why I now prefer the pump kind, since now I'm the grown up and have to clean up after the designated spinner.

Salad spinners are great, though, for real.  I highly reccomend them.  In a pinch you can suck it up with a clean non-terry dishtowel or pillowcase, but the spinner is the easiest. Swish the leaves again in the water, and DON'T DRAIN. Just gently lift out a handful or two of just leaves.  Shake off some of the water, and toss them into the salad spinner.  

handful o greens

Don't try to pack in all your lettuce at once.  The leaves need some room for centrifugal force to work its magic, fling the water off the leaves, and get 'em dry. (If you are using a dish towel, lay the wet leaves on the towel and gently pat dry.  If you are using a pillowcase, stick the leaves inside the pillowcase, hold the open end tighly closed and swing that sucker around in a circle, without knocking your shit off the walls. THAT'S why I have a salad spinner.)

Keep going, drying off all your leaves. When you're done, and left with a sink full of water, check out the bottom and look at all that crud! Satisfying, no?

big sink o dirt

Using all your lettuce right away? Good on ya, you are ready to go. More likely than not, you'll be hitting a week where you have more lettuce than you can eat that day. This is the trick to keeping things fresh and crisp for days.  Grab a stretch of paper towels, or a clean, dry, non-fuzzy dish towel and lay it out flat in front of you.  Spread your leaves out in a single layer (mostly single layer, I fudge it a lot).

big paper towel o greens.  note the salad spinner in the background.

Roll up the towel loosely, like a jelly roll, and pop the roll into a big ziploc bag. Press out some of the air, and boom into the fridge.

The towels absorb any extra moisture from the greens, and then will release it back to them so they don't wilt.  Don't press all the air out of the bag, because the greens will still be respirating--exchanging oxygen and carbon dioxide--as they age. Also, to keep waste to a minimum, we get the 2 gallon size of ziplocs so we fit more than one head/roll of lettuce in there. We also reuse the bags (and sometimes the paper towels, dried) for the next week's greens.   

big jelly roll o greens

 I don't bother doing the full jelly roll with hardier greens like kale or swiss chard.  Those are sturdy enough to last just fine once washed and dried.  But the lettuces? This jelly roll trick is effing MAGIC.  Greens, even fragile ones, will last a full week, or longer. 

Next installment? We'll talk big salad for the week.

the easiest way to organize a closet is totally fake

The easiest way to organize a closet is easy, a pain in your ass, and totally fake: Throw all your shit out. Voila! Pretty closet!

Let's face it, every post on Pinterest about closet organizing has a jam-packed closet as the "before" and a barely-anything in it closet as an "after."

really elfa? REALLY? THIS IS NOT AN AFTER.

THAT IS NOT A CLOSET FOR REAL PEOPLE.  Seriously, I do not have only 20 shirts in my closet and three dresses.  Organizational people are LYING TO YOU ALL with these pictures. Nearly every after picture I've seen puts a third of the stuff back into the closet, which looks great, but isn't how people actually live.

I mean, my current closet is big, and if I staged it like this, it would look ENORMOUS.  And I would have a pile of clothes on my bed bigger than my eldest child and no place to put them to keep my pristinely organized closet picture perfect.

Because, confession time: I am both a purger and a hoarder.  Maybe "completist" might be better descriptive than "hoarder," as (despite my occasional freak out to the contrary) I am not, in fact, living in filth and stacks everywhere. I come from a family where things were kept for years--decades even--because they were "perfectly good" but also never used.  And so I get rid of things.  But I do still regret throwing out 6 years worth of Martha Stewart Living Magazine several years ago, I have a complete collection of Cook's Illustrated magazines, I have a shit ton of yarn and fiber, and when I find I shirt I like, I buy it in every color I like. Because FUCK capsule wardrobes.  

So what, you may say, is the real way to organize a closet? 

By now, I'm sure everyone and their mother has heard of Marie Kondo's Life Changing Magic  of Tidying Up.  I know I'm not the first, or the thousandth, to blog about it.  I read through the book, and I liked some of what she said about keeping things that spark joy and ditching the things that don't (but you can pry my books from my cold, dead, hands).

 I have always folded items of clothing and "filed" them in drawers instead of stacks, as she describes--save the socks. I have opinions on socks: Socks should not be rolled together, they should ALWAYS have the cuff tucked together and folded inside so they don't come apart. I also have opinions on sheets, which is a whole 'nother post.  (Oh, and I don't anthropomorphize my things, because I am not a toddler.)

That said, much of what she has to say about closets and clothes  is kind of brilliant, at least for me.  Keep things you love--and I do think that useful everyday things fall into that category. While the random tank top might not itself spark joy in you, the outfit it completes might.  And the random tank top with the weird cut that just never sits right and has the itchy tag certainly does NOT spark joy so toss that shit. I also do not rotate clothes seasonally, because I am lucky enough to have a closet big enough to not have to, but also because so many of my clothes are 4-season pieces.  Dress + wool cardigan + heavy leggings + boots = winter outfit. Same dress + linen cardi + sandals = summer. 

And I love her mild mild debunking of other organizational tricks.  Because again, OPINIONS, I have them.  Do NOT get me started on that "trick" of hanging your hangers backwards to see how frequently you wear something. It's ridiculous and completely disregards the need for special occasion clothing and sentimental favorites. If you love something and it's a sentimental favorite, why on earth would you throw it out? Just to make space? Why is space more important than sentiment, or memories? Get rid of the shit that is "perfectly good" and never used if you want space. And face it people, no one wants to go shopping for an outfit for a funeral when the need comes up. No one. 

And so I cleaned out my closet, somewhat following her suggestions, somewhat following my own.  Three and a half giant garbage bags later (delivered to a friend, and anything she doesn't want is off to donations), it's tidy! and by no means is it a pinterest after picture, but it's so much better. I still have a shit ton of stuff crammed in there, and I still have multiple black t-shirts--now all filed in a single row though.  

I tried things on, and tossed a bunch, I refolded the chaos that had crept in, using  a number of the container store's clear drawer organizer boxes--which I already had, and are fantastic, by the by.  I used some of the post-it sticky label tape and a sharpie to label things that were not clear when folded neatly, like "camisoles" vs. "layering tanks" vs. "short sleeve layers".  I did not color code the labels, despite my inclination to, because the colored sharpies were downstairs and that would require moving myself. 

 I'm pretty pleased with the labeling solution, myself. And I extended it to the hanging things. Because I have many leggings, and could never figure out which neatly folded legging was which and where the fuck was the really lightweight capri legging goddamnit!, I decided to group them by category and hang them, labeling the hangers.  So now there are hangers with a label tape tag of "full length black leggings",  "short black leggings", "exercise leggings", "pant-like leggings", "second tier leggings", etc.  

Of course, I ignored Marie Kondo's suggestion of hanging everything in length order rising to the right, because that's silly.  A. I'm a lefty.  B. the right hand side of my full-length hanging section is partially hidden, so NO. C. By length doesn't work for the way I wear clothes. Category is way better but has it's own hidden problems.

I still am not quite sure the best way to organize the many dresses I own.  I'm leaning more toward use: tunics/dresses too short to wear without leggings, day dresses, slightly fancier day dresses, fancy dresses, formal dresses. But then where do the maxis go? I have some that are more day dressy, some that are more slightly fancier day dressy.  Do I put in each category, or do I pull into a separate section--day maxi vs formal maxi? 

Am I a super nerd to for thinking things through this far? Don't answer that.